Ceramic Band Heater Characteristics
Ceramic band heaters are designed with spirally wound inner resistance coils evenly threaded through interlocking insulated ceramic “tiles”. The ceramic core, or “mat” of tiles is housed beneath a stainless steel sheet with serrated edges. The notched edges fold over to secure the ends and a protective inner liner (to be removed at installation) secures the placement of the tiles. This combined assembly of the Ceramic Band Heater offers a flexible heating system that yields efficient transmission of conduction and radiated heat. The heat of the Ceramic Band originates from the inner coils that conduct heat at maximum temperatures.
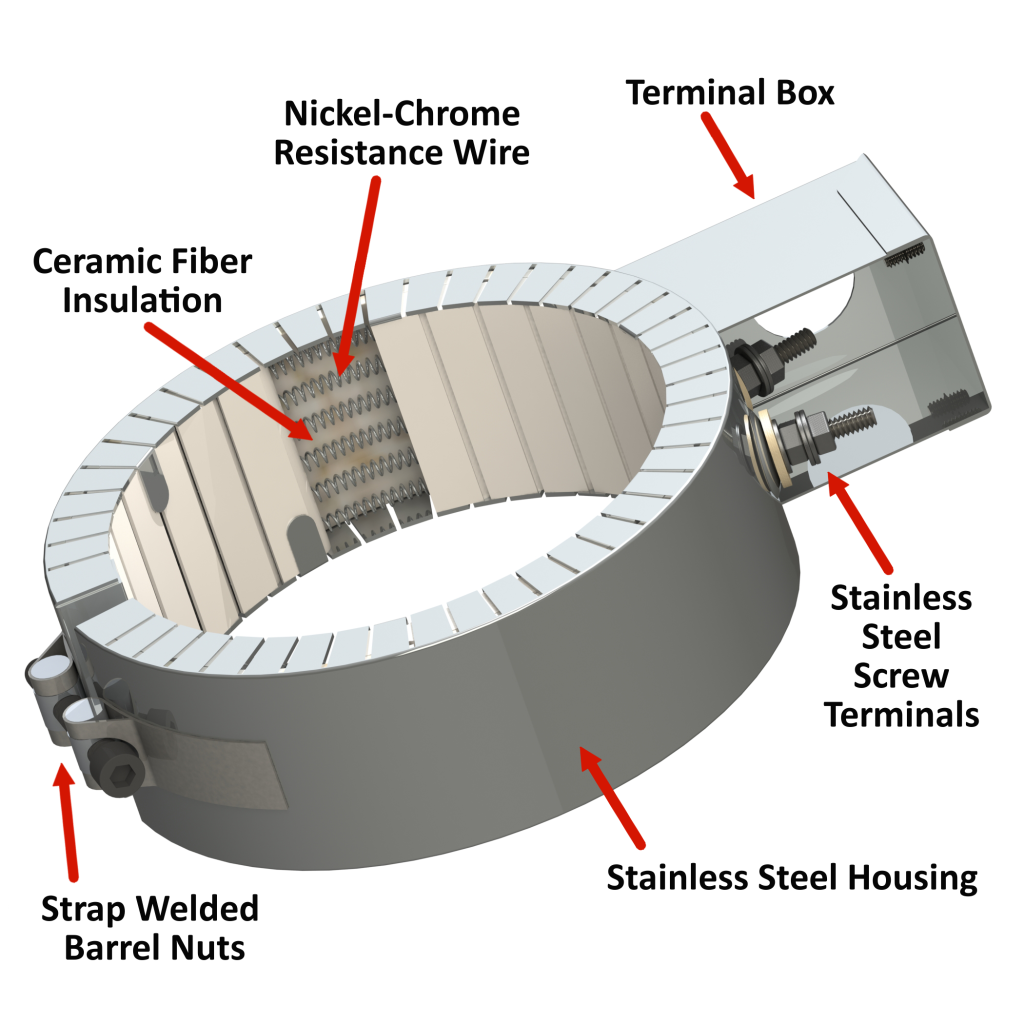
The heated coils evenly deliver heat through the ceramic tiles which radiate energy to the barrel. We offer a variety of Ceramic Band styles from standard to custom configurations. When selecting a ceramic heater, select a heater that best matches the wattage requirements – to decrease the frequency of cycling and temperature overshooting, and thereby increase the life of the heater. When installing a ceramic band heater to replace a non-insulated heater, decrease the total operating wattage by approx. 15-20 percent.
Click to see all our Ceramic Heater Band styles.
If you don’t see a band heater style that meets your needs: Call: 513-228-0481 or Email: info@heatandsensortech.com
Ceramic Band Applications:
Extruders, Injection molding machines, Blown film dies, and other cylinder heating applications.
-
Built in insulation minimizes unwanted change in temperature along the barrel.
Efficient heat transfer: Heat transfers through radiation, conduction, and convection, so a perfect fit is not required compared to other band heaters.
Heat transfers are not affected by irregular surfaces or a loose fit.
Because they operate at higher watt densities, they can be used in wider increments.
The number of bands used can be reduced with simplified wiring.
The heater is safer with the cooler external surface – over other band heaters.
The flexible design allows easy install and removal.
-
Material:
Ceramic tile thickness: 9 mm, and 11.6 mm
Coil: Nichrom A® also call
Ceramic Fiber Insulation: ¼” thick
430 Stainless Steel heath (housing)Ceramic Tiles -Common materials analysis:
(See a sample order: Ceramic Minerals Analysis)
AL₂O₃ – Aluminum Oxide
BaO – Barium Oxide
CaO – Calcium Oxide
Fe₂O₃ – Hematite
MgO – Magnesium Oxide
NA₂O – Sodium Oxide
SiO₂ – Silicon DioxideStandard Material: Sheath- is Stainless Steel; Insulation – Ceramic Fiber
Overall Thickness: Insulation is ½” and ⅝”
Standard Width Increments: ½” and Minimum Width: 1”
Minimum Diameter: (Contact the manufacturer if your required size is not listed.) One Piece: 21” Two Piece: 44” Standard Gap: ⅜” -
As with any installation utilizing electrical connectivity – use utmost precaution when handling product components to prevent electric shock and subsequent injuries.
Read complete instructions before beginning installation. Note: Ceramic Bands heaters heat by radiation and conduction, and therefore do not require the same securing methods typically required for the installation of other band heater designs.Remove existing heater before installing the replacement heater.
Do not install a heater in locations where gases, or vapors are present.
Insure there are adequate temperature controls installed to prevent overheating and heater failure
If Thermocouples are part of the heater, ensure they are free of contaminants and have good response to temperature changes – to avoid overheating.
Make sure all barrel surfaces are clean, and will be kept free from any contaminants that could seep into the heater via wiring, etc. to avoid electric shorts, and or heater failure.
Remove the inner liner before installing the Ceramic Heater.
Position the heater on the barrel. Tighten the heater via the low thermal expansion outer housing until serrated edges are firmly secure with the cylinder. Do not over tighten to avoid serrated edges from collapsing and protruding outward. Be sure to avoid compressing the ceramic insulation which will decrease the insulation value and life of the heater.
If the heater has screw terminals included, then remove the TOP nut and flat washers from the power screw terminals. Be sure not to remover or loosen the BOTTOM nut on the power screw terminals.
Make sure a qualified electrician handles the heater band wiring. Use lead wire only – with correct insulation and gauge size – for the high temperature compatibility.
When connecting power leads to screw terminals, to avoid short circuiting: adjust the terminal lugs to face away from the heater case and each other.
Be sure the voltage input to the heater band will not exceed the voltage rating allowed for the heater.
Take an amperage reading to verify correct wiring (amps = Watts ÷ Volts).
Insulate and cover any live electric connections for personal safety measures.
Make sure the installed heater will not be exposed to any accumulating contaminates while in operation to avoid heater failure, and protect the life expectancy of the heater.
Our Product Lines are US made. Call if you are in the area – and you would like to see our products: 513/228-0481.
Heat and Sensor Technology 627 Norgal Drive Lebanon, OH 45036